For a long time, I had lived with my two monitors of the exact same model (LG 27UK650-W) displaying noticeable different colors and text in one of them being much sharper than the other. They’re both driven by the same graphics card (an NVIDIA GeForce GTX 750 Ti) but one of them is connected with a Display Port cable, and the other one an HDMI cable. Several articles talk about making sure that they’re both using “Full RGB” instead of “Limited RGB” which you normally do in the Control Panel of the graphics card, and/or the settings of the monitor itself. I tried that and couldn’t get them to display the same, and interestingly, they were even showing me different options in the monitor settings (e.g. when selecting a picture mode, the Display Port monitor showed me a list of 10+ profiles to choose from, while the HDMI one only displayed 4, none matching the ones from the first one).
Today I finally found the solution! Turn off the “Use HDR” setting from Windows’ “Display Settings” window:
As soon as I did that (did I restart afterwards? I can’t remember, try that too if you need to) for the monitor on HDMI (the Display Port one didn’t even show me that setting), the picture mode menu in both monitors started showing the same list of options, I was able to make all the settings match, and now they look as close to identical as is practically possible without doing very detailed calibration.
Today I ran into an issue configuring DNS-O-Matic to update my Cloudflare DNS records (specifically, the record with the dynamic IP that points to my home IP address, and is automatically updated by the router in my home network). I entered all necessary settings in the DNS-O-Matic form, but when I sent an update to it the update to the Cloudflare service always errored out with message “err Invalid request headers (6003)”.
After a bit of trial and error, and going back and forth through documentation and tutorials, I finally figured out that the DNS-O-Matic field that says “API Token” does not expect what Cloudflare calls an API Token; it wants Cloudflare’s Global API Key.
This is actually clear in Cloudflare’s documentation on how to set up DNS-O-Matic, although I think it needs to be more explicitly stated that you’re not supposed to use the Cloudflare thing with the same name that the DNS-O-Matic form has. Maybe the documentation predates the implementation of API Tokens on Cloudlflare’s side and that’s why the terminology isn’t the clearest.
Once I put my Global API key there, the updates started working as expected. Then I pinged OpenDNS on Twitter to see if they have any plans of supporting API Tokens instead of the global API key, which would allow for more granular control of what they can do and would be a good security practice. That way if the DNS-O-Matic databases ever got compromised, the attackers wouldn’t get complete control over our Cloudflare accounts.
Today I was talking with Microsoft support to troubleshoot an Azure issue and they asked me to hit Ctrl + Alt + D anywhere in the portal to bring up overlays with debugging information. Something like this:
That shortcut was new to me and I love learning new useful keyboard shortcuts, but when I tried it… nothing happened. So I tried in another window… an incognito window… another computer… and it wouldn’t work anywhere!
I found some documentation that mentions it, but nothing about pre-requisites or notes about why it wouldn’t be working.
Now, just as people who work on IT and/or software development learn that whenever you have an inexplicable issue you always turn to look at caching and DNS, I’ve learned to also look at my (admittedly unusual) keyboard setups. And after recently solving a long-standing issue I had with accented characters, looking at my keyboard setup was fresh on my mind.
And what do you know, of course the “problem” was there! Turns out that on the standard “English: US” keyboard layout, Ctrl + Alt + D on its own does nothing. The Javascript code in the Azure portal is then free to use it as a shortcut. But on the “English: United States – International” layout that I use, Ctrl + Alt + D actually produces a character: ð (I discovered this by pressing that key combo into the supreme tool: Notepad). And I bet the Azure portal isn’t prepared to handle that case.
So, solution to get those debugging overlays? Simply change my keyboard layout just to trigger the shortcut and enable/disable them. When you do funky stuff with your keyboards, like I do, you should always keep it in mind when something doesn’t seem to work as expected. And keep Notepad (or your plain text editor of choice) handy to check that your key presses aren’t generating characters that a standard layout would not.
This post requires some quick bit of context. First, for more than 10 years I’ve been using DVORAK as my main keyboard layout. Let’s skip the arguments about it being better than QWERTY or not; at this point I just like it, and my subjective experience is enough for me to keep using it (and as a programmer, I’ve found that it does give me easier access to characters that come up frequently when coding). Second, my native language is Spanish, and that’s what I type in when chatting with Spanish-speaking friends, among other things. Importantly, I write following the rules for accenting characters (á é í ó ú), and we also have the letter ñ, that doesn’t have its own key on the US QWERTY nor the DVORAK layouts, so I also configured the Spanish – Latin American layout so I can switch to it when necessary.
That said, I’ve known for a while that if I’m typing in Microsoft Word with the Dvorak layout, I’m able to use a couple of simple key combinations to type accented characters: Ctrl + ' followed by a vowel will produce the accented vowel, and Ctrl + Shift + ` (which is a ~) followed by n will produce ñ. But the same key combinations in any other application, would not work! I would only get unaccented vowels or the letter n. So when I’m chatting, doing a browser search, writing code comments in Spanish, etc, I frequently have to switch my keyboard layout within Windows to Spanish (at least I have Win + Space as a shortcut to do that), type my accents, and then go back to my main Dvorak layout. It completely breaks my flow while typing, and that’s pretty annoying.
Today I was playing with my new split, mechanical, can-remap-any-keys keyboard (the Dygma Raise, post about that probably coming soon), thinking about setting the Dvorak layout directly on it, and some funky interactions with the Windows keyboard layout made me decide to figure out the issue once and for all.
And that’s how I learned about dead keys. In a nutshell, there are keyboard layouts that define some of their keys in a way that clicking on them has no immediate effect, and instead they (potentially) modify what happens on the next keystroke. For example, the United States – International keyboard layout included in Windows treats the key for a single quote ' as a dead key: press it once and nothing happens, but if you then press a vowel you get an accented vowel (and if you press anything that does not have an accented version, you get the quote followed by whatever character came next, or just the quote if you pressed the space bar as the follow-up character). Same goes for the tilde ~ with the only difference that you have to start with Shift + ` to “press” the tilde dead key, and then pressing n produces ñ. Accents in the Spanish – Latin American layout work just like that too.
Now, here’s the thing: the United States – Dvorak layout that comes with Windows does not have any dead keys, so how come I’ve been using them for years in Microsoft Word? Well…
In Microsoft Word (and in most other text-input fields), using the Control key with a key that usually resembles the diacritic (e.g. ^ for a circumflex) acts as a dead key
Aha! So Word makes an effort to be smart no matter your actual layout, but other applications can’t be bothered (since they’re not text processors, I guess I don’t blame them).
At this point a solution was brewing in my mind. I knew that the standard US keyboard layout that comes with Windows does not have dead keys, but that the United States – International layout does (precisely because it caters to users who might need “international characters” like accented ones). And I vaguely remember having had, or read about, a Dvorak – International layout, which hopefully does the same thing. I couldn’t find one among the layouts included with Windows, but a Google search confirmed that there’s several such layouts created by different people, which provide dead-key support in different ways (sometimes in the same way as the United States – International layout, sometimes using Ctrl as Word does, sometimes both), and are generally easy to install.
I’m not sure if I’ll go with that solution for my particular problem, but I’m pretty confident it would work. The fact that I can remap keys in my keyboard’s firmware allows me to create the Dvorak layout there, and permanently use the United States – International layout in Windows, which has dead key support… so I might just stick with that for now. But if you want to support any physical keyboard and be able to type accents on a Dvorak layout, your best bet is to find and install an “international version” for it, with dead key support.
Something I learned a while back when dealing with computers in general, was to try to keep my files in a separate drive than the Operating System. The first reason for that is to be able to easily do a clean reinstall of the OS if something goes terribly wrong (which can happen relatively easy if you’re learning UNIX, dealing with obscure Windows features, or doing a lot of software installs/uninstalls), without having to first move/backup your personal documents and similar files. Another reason is to keep disk usage low in the disk/partition where the OS lives. This is particularly relevant when the OS is installed on an SSD drive, which tend to not be huge (compared to HDD drives) and can easily run out of space if we put our decades-old photo/video collection in them.
All the “default folders” that Windows uses for user documents (Documents, Downloads, Desktop, and some others) are pretty easy to move to a different drive. Just browse to C:\Users\<username>\, right click one of those folders, go to the Location tab, specify a new path, and click Move.
Moving Windows’ default folders to another drive
And that’s it! You have to do this one by one for each of these Windows-managed folder, but luckily they’re not that many. If you already have a lot of data in them and you ask Windows to move it for you, then be prepared to wait according to how much data there is.
But things don’t end here. Because of the first reason mentioned above, I also want to make sure that configuration files created by applications I use (at least some of them), are also kept in a separate drive. So that after reinstalling the OS and reinstalling my most common tools/applications, I don’t have to recreate my customizations too. However we don’t usually have that much control over where each application decides to write its configuration files.
In the UNIX world this problem is basically nonexistent, because the user’s home directory is where pretty much everything writes configuration files that are specific to the current user. In Windows, many applications write them to wherever the %USERPROFILE% variable points to (by default C:\Users\<username>\). Sometimes directly there, sometimes under a subfolder. Another common location is to write them under %APPDATA% or %LOCALAPPDATA%, which by default are C:\Users\<username>\AppData\Roaming\ and C:\Users\<username>\AppData\Local\. The details of how these two differ from each other are outside the scope of this discussion, but you can apply the same idea that we’re about to see.
So what can we do about those files? At least for some of them, the solution is symlinks! You can think of symlinks as virtual files/folders that you put somewhere, and tell them to point to some other location, so that anything that tries to work (read/write) with the location where the symlink lives, is actually working on the target location, without being any wiser or having to know about the redirection that’s happening.
Let’s see this in action with a real-world example. In my machine I use Windows’ OpenSSH client to connect to remote computers pretty frequently. In order to not have to learn the different parameters, ports, usernames, etc. that I have to use fore each of the remote machines, I like to use an SSH config file. A simple one looks like this:
Host vm1
	Hostname actual-name-of-computer-1.some-domain.com
	User userforcomputer1
	IdentityFile ~/.ssh/id_ed25519

Host vm2
	Hostname actual-name-of-computer-2.some-other-domain.com
	User root
	Port 2222
Which lets me type ssh vm1 or ssh vm2 and have the OpenSSH client take care of the details for me.
The issue is that the OpenSSH client expects to find this file in %USERPROFILE%\.ssh\config, i.e. C:\Users\<username>\.ssh\config. But that file is definitely something that I want to keep with the rest of my data, so a OS reinstall doesn’t wipe it out. And there’s no way to tell this particular application to always look for the config file somewhere else (we can pass an extra parameter to ssh to tell it the location, but then we have to remember to pass that every time; inconvenient). What we can do is create a symlink at C:\Users\<username>\.ssh\ and point it to, say, D:\Users\<username>\.ssh\ (I like to create a similar folder structure in whatever drive I move the stuff to, makes it easy to know where the original locations are). That way the OpenSSH client will keep doing what it always does, but behind the curtains Windows will be actually dealing with files in the D:\ drive instead of the C:\ drive.
To create that symlink, open cmd (specifically cmd, this won’t work from Powershell or other consoles because the executable to create symlinks is part of cmd) and run something like this:
And there you have it! The configuration file is kept safe in the D:\ drive, while OpenSSH still thinks everything is happening in C:\.
This approach works really well for applications that use a subfolder under %USERPROFILE%, and not so well for applications that write potentially many files directly in that folder. You can create a symlink for each file and they’ll work, but you need to know exactly which files to do it for, instead of just symlinking the one folder. And now you ask “Why don’t I just symlink C:\Users\<username>\ directly?”, which is a great question. And the answer might be that you can, but I haven’t convinced myself that it’s completely safe, so I can’t say that you should. If you do a search for this, some sources say that moving the User Profiles folder to another drive will stop Windows Update from working in the future, others say that they’ve done it and had no problem updating, others that it’s only (semi)supported if you do it with special configuration alternatives when installing Windows… it’s also not entirely clear to me if symlinking the profile folder of a specific user also counts as “moving the User Profiles folder to a different drive”. As tempting as it sounds, I haven’t made the time to test it. If you decide want to try this, you’ll probably need to log in with a different account, so you can move all the files for the user whose profile you want to move (otherwise some files could be locked or actively in use) before creating the symlink. And if you do, let me know how it went.
To conclude, note that in case of an OS reinstallation, the files will be safe in the other drive, but you’ll have to recreate the symlinks.
Robo3T is a pretty convenient tool to work with MongoDB databases. Version 1.3 came out over a year ago, so this post might seem terribly outdated, but it’s worth putting out because I just now I realized that one of the improvements in 1.3 is that it encrypts connection passwords instead of saving them as plaintext on disk.
I had 1.2 and 1.3 installed side by side (for no good reason, to be honest) but after realizing this, I immediately uninstalled version 1.2 and deleted the folder where passwords are stored in plaintext: C:\Users\<username>\.3T\robo-3t\1.2.1\ (and earlier). If for whatever reason you’re still using version 1.2 today, I strongly suggest you install 1.3, copy your connection info if necessary (I don’t remember if it did this automatically for me or not when I first installed it), remove 1.2 and clean up after it ASAP.
Recently I got into a situation where Visual Studio 2019 ignored all my breakpoints, even in the simplest applications. I first thought it had to do with particular projects (I was playing around with development for the .NET runtime), but a brand new, super-simple console application showed the same behavior.
As you can see, Visual Studio even said that no symbols were loaded for the document. But it wasn’t even for a library I had imported, it was my own application!
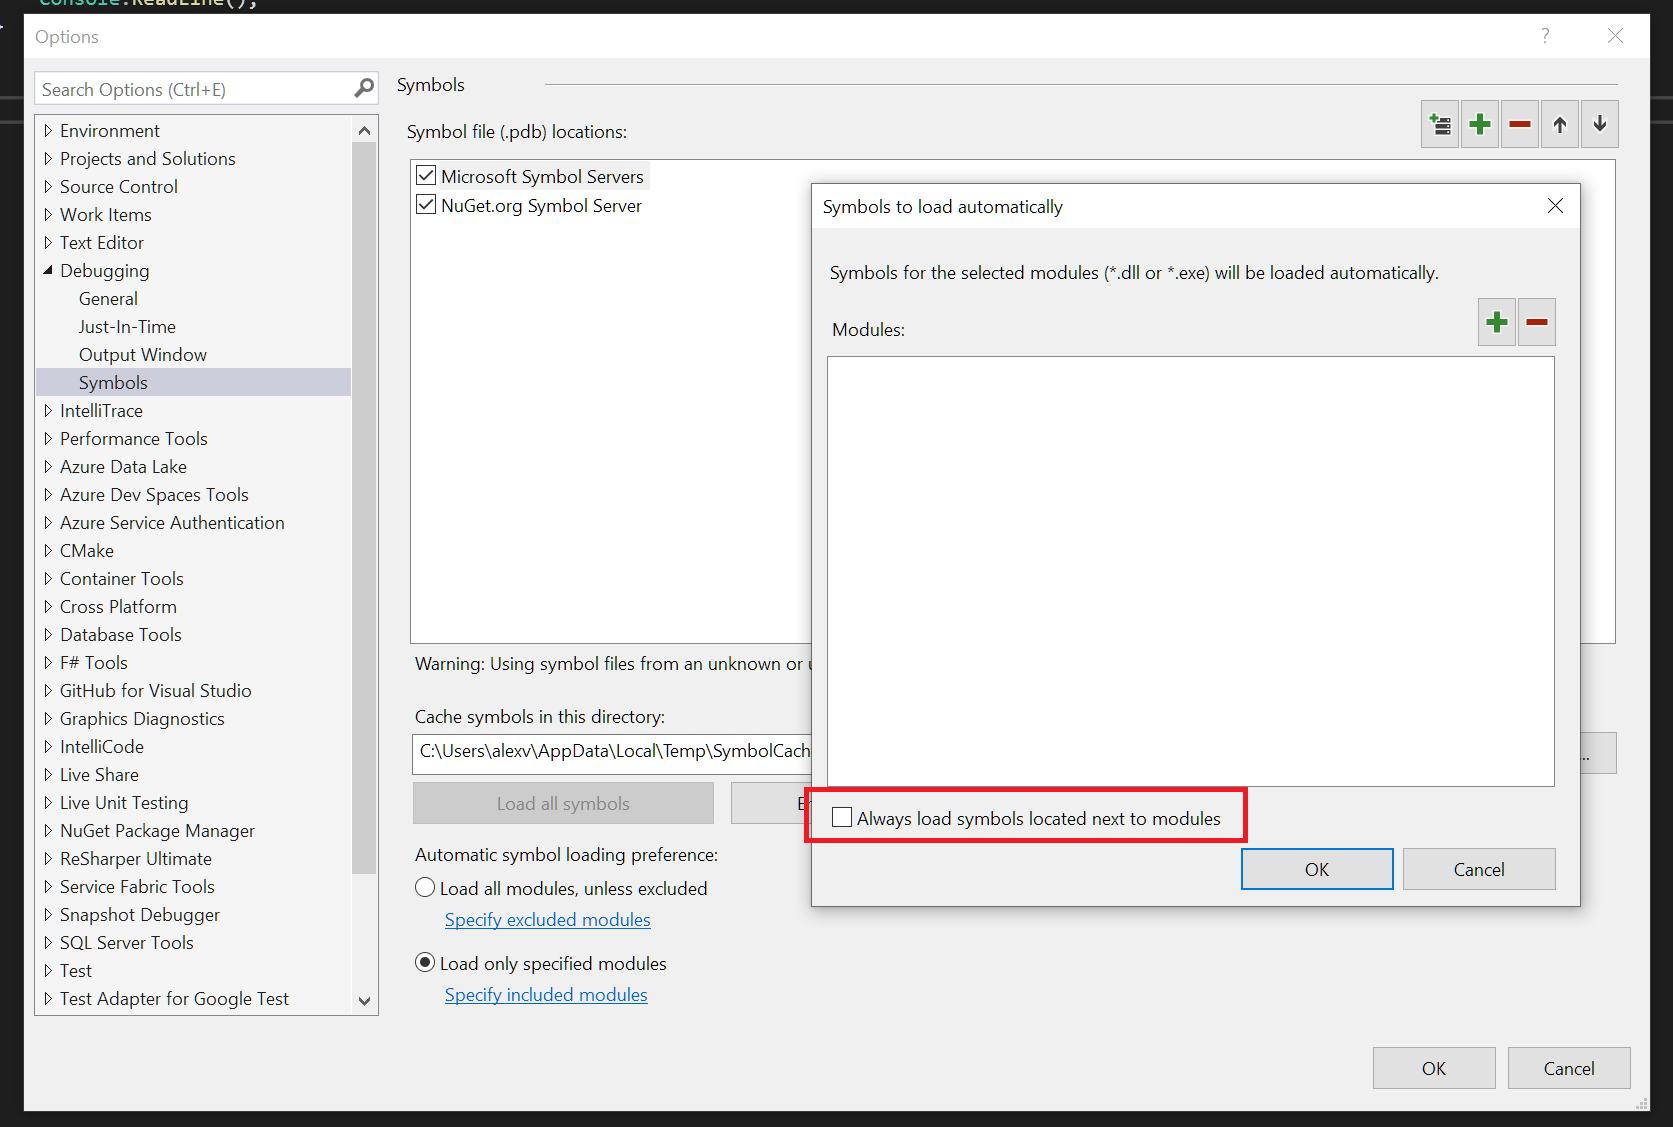
Once I realized this was happening for all applications, I went menu-exploring for any options that might be causing this, and it didn’t take too long for me to find the culprit. Something I had disabled at some point while trying to stop VS from trying to load symbols for all the .NET internals, because it was causing pretty noticeable delays. It wasn’t very clear at the moment what the effect was going to be, but now I get it! “Always load symbols located next to modules” is what tells Visual Studio to automatically load the debugging symbols created next to your app when developing locally, so you probably want to make sure this is always enabled:
You get here by opening the Tools menu, selecting Options, then going to Debugging -> Symbols, and clicking on Specify included modules at the bottom. Also of note, this is only relevant if you’ve selected “Load only specified modules” as opposed to “Load all modules, unless excluded”, like shown in the screenshot.
As soon as I checked that box and OK-ed out of all pop-ups, my breakpoints started working normally again.
Recently I had a scenario where I wanted to restrict the network traffic coming out of certain processes I started inside a container, so they could only do the minimum required for them to work, and not reach anything else outside the container. In order to explain what I found, let’s imagine that my process only wants to make a HEAD HTTP request to http://www.google.com (on port 80, not 443).
It will obviously need to send packets with destination port 80, and packets with destination port 53 so it can make DNS requests to resolve http://www.google.com. So let’s implement a quick setup with iptables to accomplish this. We’ll use the following Dockerfile that installs curl, iptables, and dnsutils on top of the default Ubuntu image, so we can test our scenario.
Dockerfile
FROM ubuntu:latest
RUN apt-get update && apt-get install -y curl iptables dnsutils
And the following docker-compose.yml file to help us build and run our container.
The scenario I want to talk about only happens when starting services with Docker Compose, not when starting containers directly with docker run, so using a docker-compose.yml file is necessary even if it feels a bit overkill. Note we specify the NET_ADMIN capability for the container, which we need so we can use iptables, and a command that will keep the container running, so we can connect to it after Docker Compose starts it.
Now we run docker-compose -p test up -d in the folder that contains both our files, Docker Compose builds the image and starts a container. We can then connect to that container with docker exec -it test_my-container_1.
Let’s start by verifying that we can make our HEAD request to www.google.com:
Great. Now let’s set up the iptables rules discussed above and make sure they look right.
We add the rule for localhost just to make sure that we don’t break anything that’s connecting to the machine itself (without it, the rest of this scenario won’t work as expected).
Now we test curl --head www.google.com again to make sure everything’s fine… but it says it cannot resolve the host! Furthermore, nslookup www.google.com times out. And checking the iptables rules we see 5 packets dropped by the last rule, but none accepted by the rule for UDP port 53. How come?
Well, it turns out that when Docker Compose creates a service, it creates iptables rules in another table (the NAT table) to reroute certain things through the Docker infrastructure. In particular, it changes the port of DNS requests from 53 to something else. You can see this by running iptables -L -v -t nat:
Here we can see that there’s a rule mapping UDP port 53 to 53789, when the request is going to IP 127.0.0.11 (where Docker hosts its DNS resolver). So if we now add another iptables rule for that port to our setup, we’ll see that our curl command works again!
However, that port is not static, so the approach that I ended up taking was to create a rule to allow any packet with destination IP 127.0.0.11, which is the one where Docker hosts its DNS server, and the only one for which it maps ports.
Conclusion
If you plan to mess with DNS network traffic in your containers and you use Docker Compose to start them, be aware that Docker sets up rules to change the destination port for DNS requests.
I’ve been using Microsoft OneDrive’s Personal Vault feature for sensitive documents for a while now and overall I’m pretty happy with it. But recently I noticed that after I unlocked the folder in my computer, double-clicking a PDF file opened up Acrobat Reader DC (my default PDF reader) but I got the following error:
After some googling I found that this seems to be an issue with Acrobat Reader’s Protected Mode feature. The intention behind it is good (sandboxing the PDFs that you open, so they can’t wreak havoc indiscriminately in the computer), but in this particular case it was hindering me.
Since I only put PDFs in my Personal Vault after I’ve “vetted” them, and I’m pretty careful with what I open in general, I decided it was fine for me to disable Protected Mode by going to Edit -> Preferences -> Security (Enhanced) and unchecking Enable Protected Mode at startup:
And voilà! PDFs from my Personal Vault now open correctly when I double click them.
Recently I learned about a pretty simple feature that is super useful when working with .NET solutions that have several .csproj files, and the same NuGet package dependency in two or more of them.
The simple way to do this —what Visual Studio’s “Manage Nuget package” dialog does— is to add/update PackageReference elements in each csproj, like this:
Separate references to the same Nuget package in different projects
But this means that whenever you want to update this dependency, you need to do it separately in each project… and I hope you don’t have too many of them.
The DRY way to do this, is with Import elements in the csproj file, that reference other (partial) csproj files, like this:
Shared, partial, .csproj file referenced by other .csproj files
Note that I used .csproj.include for the shared csproj file; the extension doesn’t actually matter.
Now whenever you need to update that dependency, you can do it in a single place and all the projects that reference that file will keep their versions in sync.
The only caveat I’ve found with this method is that Visual Studio’s “Manage Nuget packages” dialog doesn’t play well with it. If you use it in any particular project to update the package defined in the common file, a new PackageReference will be added to that project file, and the Import statement will remain. This won’t cause a build error, but depending on the order of the PackageReference and Import elements in your project file, might end up causing one or other version of the package to be used. So make sure that your whole team understands how these shared dependencies packages need to be updated going forward.